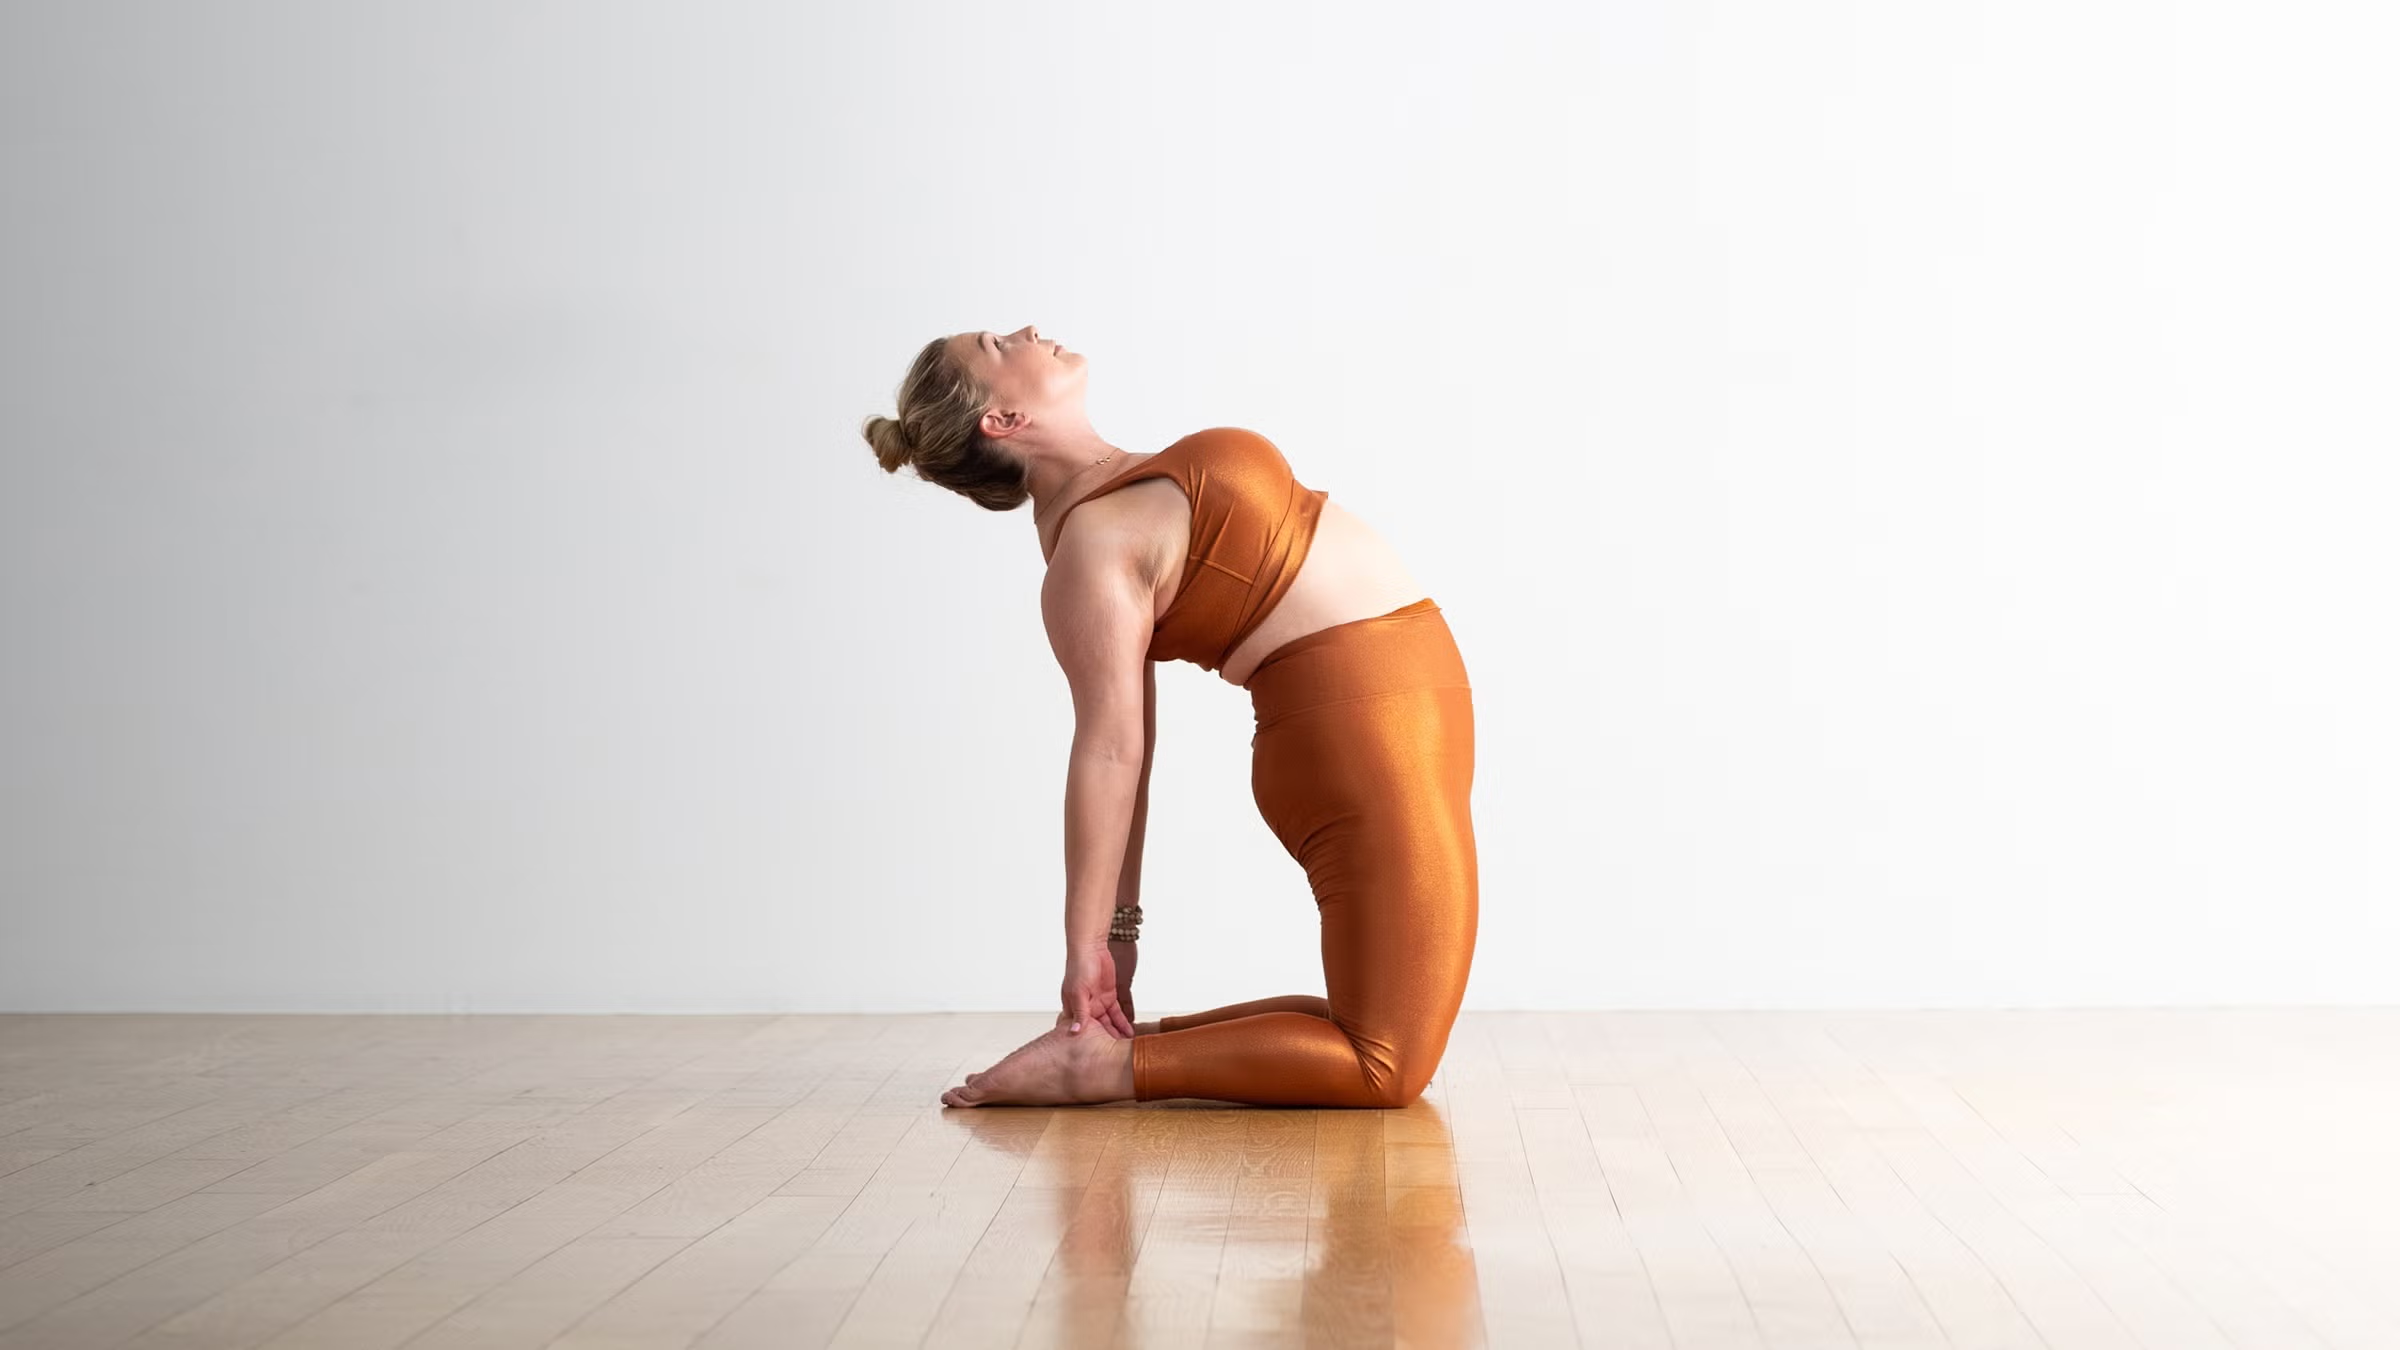
Camel Pose, also known as Ustrasana, is a powerful heart-opening posture that mimics the shape of a camel’s hump. It’s a deep backbend that stretches the entire front of your body—and when done right, it can feel really good.
That said, Camel Pose can also be a bit intense. We spend so much of our time hunched over desks, computers, or behind the wheel that opening up the spine this way might feel unfamiliar at first. So, it’s important to focus on your alignment and keep your breath steady throughout the pose. When practiced mindfully, Camel Pose creates space, openness, and a feeling of freedom in your body.
Benefits of Camel Pose
Camel Pose brings a ton of benefits to your body. Here’s what it can do for you:
- Stretches and opens the shoulders
- Opens up the chest and the entire front body
- Strengthens the core and thighs
- Improves flexibility in the hips and spine
- Helps with spinal alignment and posture
- Supports digestion and overall body balance
Warm Up Before Camel Pose
You should always warm up before diving into Camel Pose. Since it’s such a deep backbend, it’s often placed toward the end of a yoga session—right after your standing poses and before transitioning into restorative postures. Here are a few great warm-up poses to try first:
1. Standing Backbend
This is a great way to activate your core and start opening your chest.
- Stand at the top of your mat, feet hip-width apart.
- Place your hands on your lower back with fingertips pointing up or down.
- Roll your shoulders back and start lifting your chest toward the ceiling.
- Press your hips forward a little and gently lean back.
- Stay here for 3–5 deep breaths.
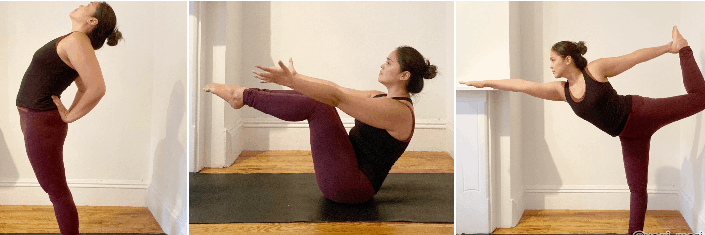
2. Boat Pose
This one fires up your core and helps open the chest and thighs.
- Sit down with knees bent and feet flat.
- Hold behind your knees and lean back slightly.
- Lift your feet off the ground until your shins are parallel to the floor.
- Roll your shoulders back, engage your core, and lift your chest.
- Reach your arms forward or keep holding your knees.
- Stay for 5 deep breaths.
3. Dancer’s Pose
A standing backbend that also challenges your balance—perfect prep for Camel.
- Start standing with feet together.
- Bend your right knee, bringing your heel toward your glutes.
- Reach back with your right hand and grab your ankle from the inside.
- Lift your left arm up alongside your ear.
- As you inhale, lift your chest; as you exhale, kick your foot back and reach forward.
- Stay for 5 breaths, then switch sides.
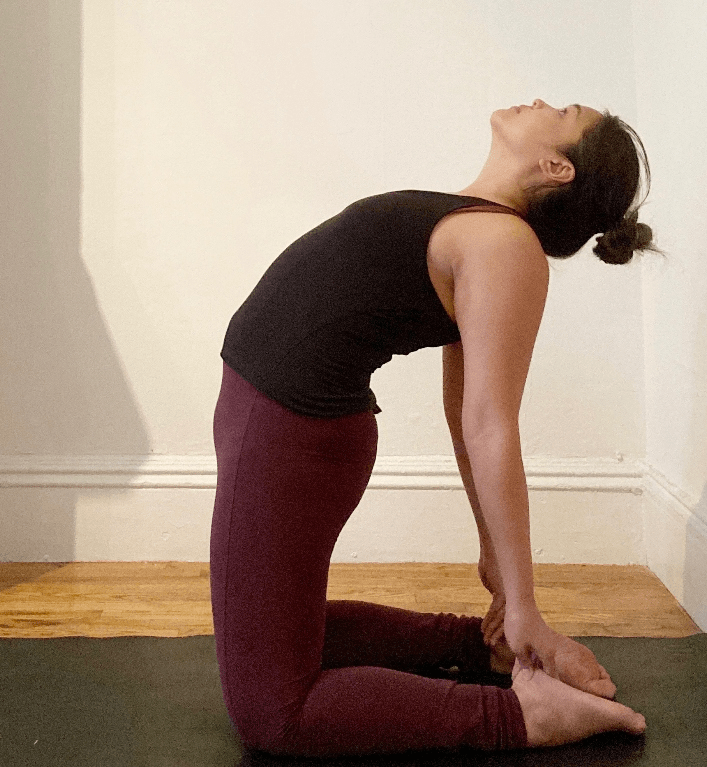
How to Do Camel Pose
If it’s your first time trying Camel Pose, take it slow and focus on stability.
Step-by-step:
- Kneel at the center of your mat with knees hip-width apart (about two fists of space between them).
- Make sure your toes point straight back and your ankles align with your knees.
- Place your hands on your lower back, fingers pointing up or down—whichever feels best.
- Roll your shoulders back and feel your shoulder blades sliding down.
- Gently push your hips forward and begin lifting your chest up.
- Let your heart lead as you open your chest and relax your head back (no need to drop it all the way).
- You can stay with your hands on your lower back or, if you’re ready, reach back to grab your heels.
- If holding your heels, place thumbs on the outside, fingers on the inside—keep your grip secure but light.
- Breathe deeply and hold for 5 breaths.
- To come out, bring your hands back to your lower back and rise slowly.
Common Mistakes to Watch For
Alignment is key in backbends. Here are a few things to avoid:
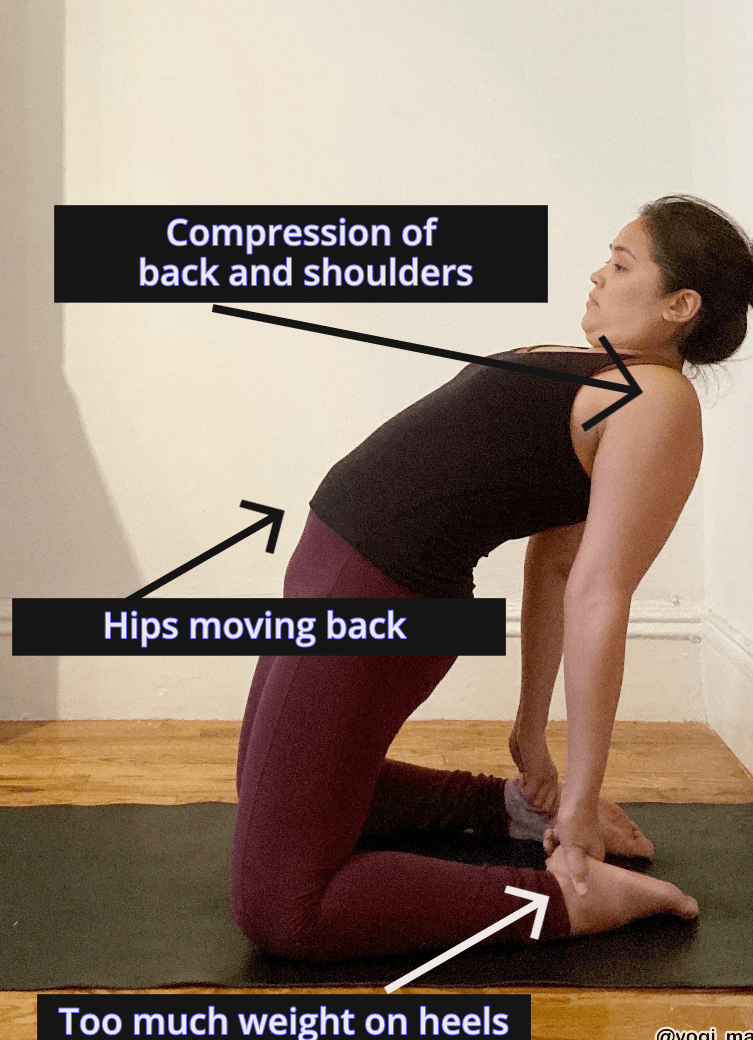
- Too much weight on heels: Don’t dump your weight backward. Keep a light grip on your heels and stay lifted.
- Hips falling back: Push your hips forward so they stay in line with your knees—this keeps the front body open and the back strong.
- Lower back compression: If you feel a pinch in your low back, you may be compressing. Lift through the chest and lengthen through the spine.
- No back support: Can’t reach your heels? No worries—keep your hands on your back to avoid strain or injury.
Modifications to Make Camel Pose Easier
Camel doesn’t have to be all-or-nothing. Here are ways to make it more accessible:
- Keep hands on your lower back for support instead of grabbing your heels.
- Adjust your gaze—if your neck feels strained, look forward or up, not all the way back.
- Practice near a wall to help guide your body alignment.
- Use knee support like a rolled mat or blanket if your knees are sensitive.
Beginner Tips for Camel Pose
- Focus on your breath: It’s easy to breathe shallow or even hold your breath in this pose. Slow it down and breathe deeply.
- Lead with your heart: Think of lifting your chest rather than dropping your head.
- Use your upper back: Engage your shoulder blades to open up the chest without straining your lower back.
Fun Variations of Camel Pose
Ready to level up? Try these variations once you’re confident:
- Half Camel: Keep one hand on your lower back and reach the other arm up and back.
- Prayer Hands or Arm Reach: Bring your palms to your heart or stretch both arms up and back while keeping your chest open.
- One-Legged Camel: Bend one knee, bring your foot close to your sit bones, and grab the ankle or foot with the same hand. Keep the other arm reaching overhead.
When to Avoid Camel Pose (Contraindications)
Camel Pose isn’t for everyone, and that’s okay. If you have any of the following conditions, take extra care or skip it altogether:
- Back, spine, or neck issues
- High or low blood pressure
- Migraines or vertigo
If you’re unsure, ask your yoga teacher for modifications. And remember—it’s perfectly fine to feel a bit dizzy or nervous the first time you try this pose. Go at your own pace, use props if needed, and listen to your body. You’ve got this!
Leave a Reply